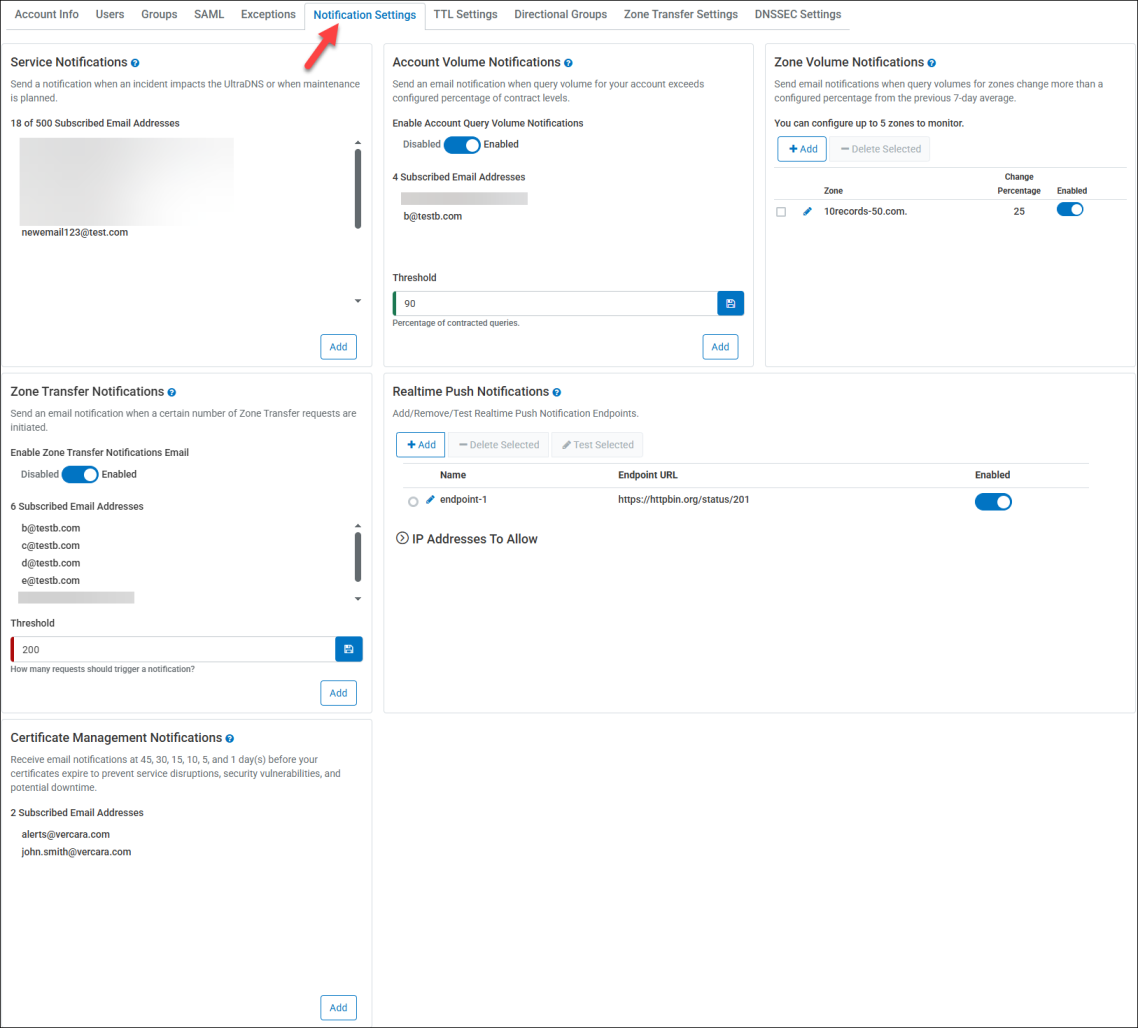
Notification Settings
The Notification Settings section allows you to customize how you wish to receive notification alerts, as well as customizing who the alerts should be sent to.

|
The Notification Settings section is only be visible for the Primary User, and those users in the Administrative user group. |
Service Notifications
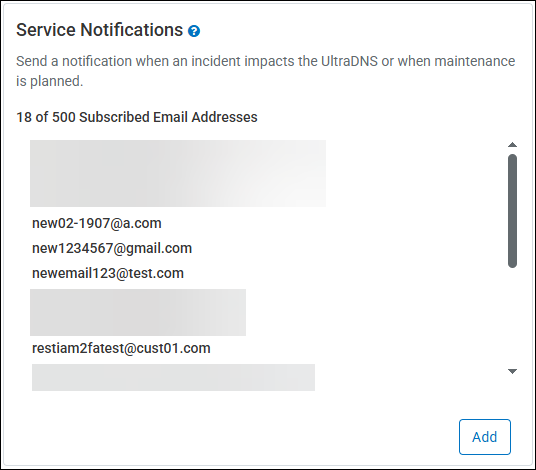
The Service Notification configuration allows an account Administrator to configure email addresses that will receive system generated emails for incidents that impact the UltraDNS service.
The following are some example scenarios of a Service Notification email being sent:
-
Performance Issues on the Managed Services Portal
-
Service Unavailable / Service Outage
-
Planned Events or Maintenance Alerts
Click the Add button to add an email address to the Subscribed Email Addresses list for Service Notifications. Provide the email address and click the Add button.
A maximum of 500 email addresses can be configured for the Service Notifications section.
To remove a Subscribed Email Address, hover over the email address you want to remove, and click the minus icon.
Account Volume Notification
The Account Volume Notification feature allows an account Owner, or users in the ADMINISTRATIVE group to configure up to five email addresses, that will receive daily system generated email
alerts whenever the account’s DNS query volume exceeds a configured threshold value (percentage).
The threshold limit will be a percentage based on the account’s contractual DNS query volume limit with UltraDNS.
This is a daily system generated email, so each day that the account has exceeded the configured threshold value, an email will be sent to each configured email address. You can
either change the threshold value or turn off the notifications to stop the emails.
To enable Account Volume Notifications:
-
Toggle the slider-bar to Enabled.
-
In the Threshold field, provide an integer value that will determine at what threshold value an Account Volume Notification will be sent.
-
The threshold value is equivalent to the percentage usage of your DNS query volume contractual limit for the account. An integer value between 1 and 100 (percent) is allowed.
-
-
Click the Save icon (the floppy disk icon).
-
Click Add to provide an email address.
-
Click Add and the email address will be added to the Subscribed Email Addresses section.
-
A maximum of five email addresses can be configured.
-
Once added, hovering over an email address will display a delete option ( - ) to remove the selected email address.
-
The notification email will provide the contractual monthly DNS query volume limit for your account, and the current volume limit on the day that the indicated threshold was exceeded.
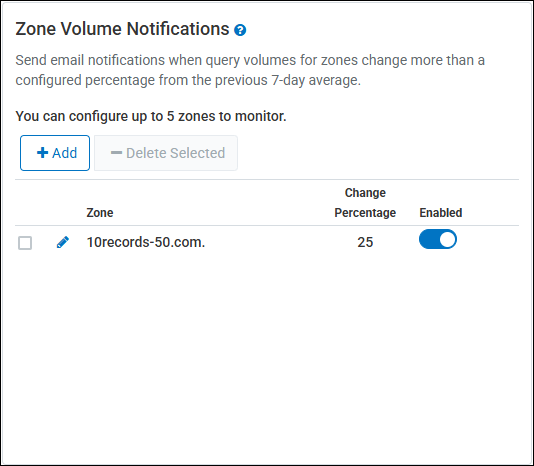
Zone Volume Notifications
The Zone Volume Notifications function allows you to monitor the Query Volume changes of up to five (5) zones (domains) within your account, and receive automated system generated email notifications if the Query Volume exceeds a configured percentage of change. The Query Volume for a configured zone is taken over the course of a seven-day average.
Each Zone can be configured to have its own unique percentage of change that will trigger email notifications, as well as up to five email addresses that will be notified when the percentage of
change is exceeded. Click the Add button to configure a Zone Volume Notification.
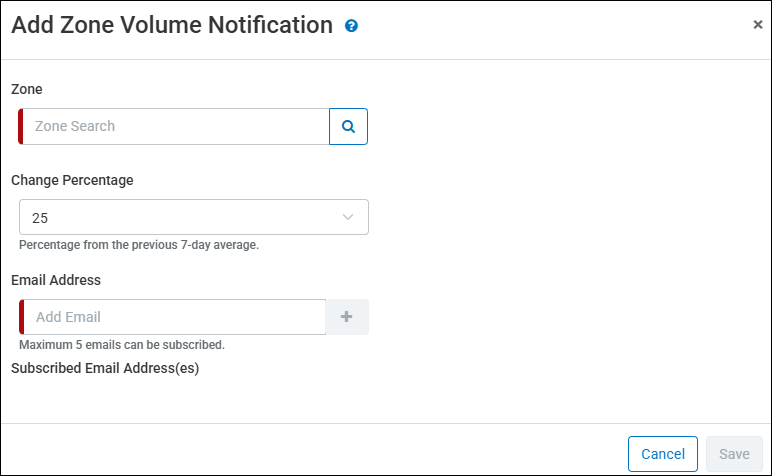
To Add Zone Volume Notifications
-
Use the Zone Search to find a zone that your account has access too. The search feature supports wildcard searches.
-
Select a pre-configured Change Percentage value from the drop-down menu of available options.
-
The Change Percentage will be used as an average against the previous seven-days' worth of queries for the selected zone.
-
-
Provide a valid email address, and then click the " + " (plus) icon to add the email address to the Zone Volume Notification. You can add up to five email addresses per configured Zone
Volume Notification. Your list of added email addresses will appear below the Email Address field.-
Click the " - " (minus) icon to remove an email address from the configured notification.
-
-
Click Save once you are finished.
By default, the Zone Volume Notification function will be Enabled whenever a Zone Volume Notification is configured. To stop notification emails, click on the slider bar next to the desired zone name so that the slider bar is grayed out (the toggle is facing left).
Edit Configured Zone Volume Notifications
To Edit a configured Zone Volume Notification, click the ![]() icon next to a zone. You can modify the Change Percentage and/or the Email Addresses. Click Save after making
icon next to a zone. You can modify the Change Percentage and/or the Email Addresses. Click Save after making
any updates.
The Zone Volume Threshold Notification email contains the following information:
-
Date - The date that the Change Percentage value was exceeded (based on the seven-day query average).
-
Zone Name - The Zone Name that exceeded the configured Change Percentage value.
-
Query Volume - The total Query response count for the zone.
-
7-Day Average - The seven-day query average for the zone.
-
Percentage Change - The percentage integer value of query change for the seven-day average.
Zone Transfer Notifications
When there are Zone Transfer updates or failures, this section allows you to customize the recipient(s) that should be notified, and the threshold limit at which the notifications should be sent.
To enable Zone Transfer Notifications:
-
Toggle the slider-bar to Enabled.
-
In the Threshold field, provide an integer value that will determine at what threshold value a Zone Transfer Notification will be sent.
-
The threshold value is equivalent to the number of zone transfer failures that will occur before notifications are sent. The threshold value can be between 0 and 100,000.
-
-
Click the Save icon (the floppy disk icon).
-
Click Add to provide an email address.
-
Click Add and the email address will be added to the Subscribed Email Addresses section.
![]()
The following examples are designed to assist users in understanding how configuring the Threshold value can significantly decrease the number of emails they will receive, as well as being properly notified when incidents occur.
Scenario 1
A zone transfer client experiences 1001 failures from a name server within an hour. If the Threshold value is set to 1000 (and Email Notifications are enabled), the recipient will receive two emails. One email providing the details of the first failure that was identified, and a second email outlining the other 1000 failures (i.e. threshold has been reached).
Scenario 2
A customer experiences intermittent transfer failures and successes; 50 failures and then 50 successes. If the Threshold value is not set, the customer will receive 100 emails (one for each failure, and one for each success). If however, the customer has configured the Threshold value (to 1000 for this example), then only four emails will be sent. One for the first failure identified, a second that will outline all 49 of the failures, a third that identifies the first successful restore, and then a final email outlining the other 49 successful restores.
Scenario 3
A zone transfer client experiences 200 failures from a name server within an hour. If the Threshold value is set to 1000 (and Email Notifications are enabled), the recipient will receive two emails. One email providing the details the first failure that was identified, and a second email outlining the other 199 failures after one hour. This notification will inform the recipient that the threshold has not yet been reached, but that failures still exist.
To remove a Subscribed Email Address, hover over the email address you want to remove, and click the red minus ( - ) icon.
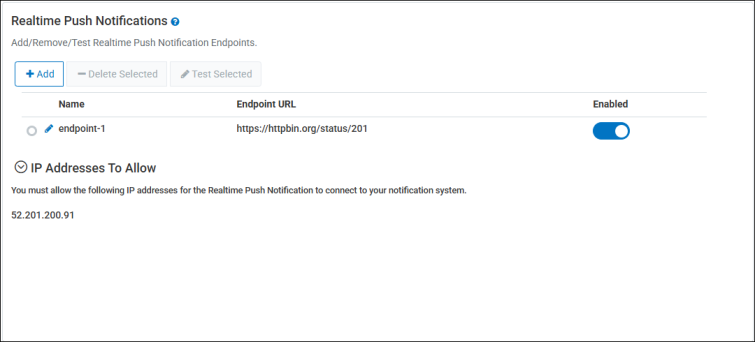
Realtime Push Notifications
The Realtime Push Notifications feature allows Owners and/or Users in the Administrative group to configure a webhook to directly receive system notifications related to Domain and/or Record changes for an account.
|
|
For those users under a Multi-Level Account Management Hierarchy, accounts which have the RESELLER and/or RESELLER_ADMIN Account Feature will not be able to view or enable Realtime Push Notifications for their account. |
A Webhook is a means in which web applications can communicate directly with each other. The purpose of using a webhook is that it allows you to send real-time data from one application to another whenever a given event occurs.
Once the URL of the receiving server is configured, notifications will begin to be sent directly to customers within sixty (60) seconds of being configured.
|
|
A maximum of 3 Realtime Push Notification configurations are allowed. |
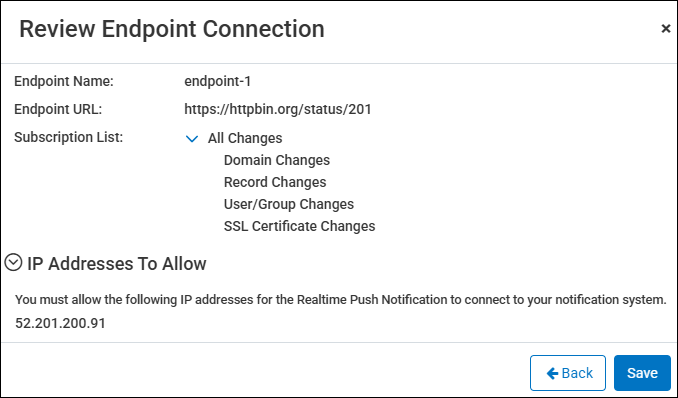
Before proceeding with the configuration, please make sure you have whitelisted the following IP addresses to allow the UltraDNS system to connect to your system.
-
52.87.134.132
-
52.201.155.120
-
52.201.103.62
-
52.201.155.234
-
52.10.123.90
-
52.10.63.3
-
52.39.68.132
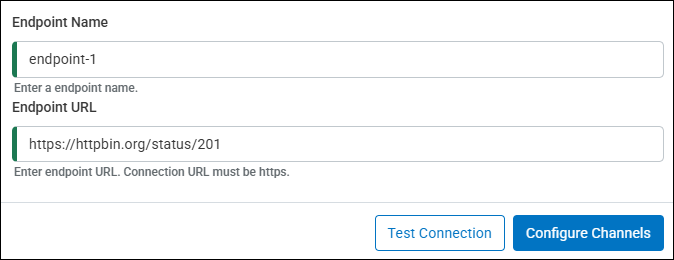
Add a Realtime Push Notification Configuration
-
Select Accounts from the left-hand navigation menu.
-
Select your Account Name, and then select Notification Settings.
-
From the Realtime Push Notifications section, click the Add button.
-
Provide the Endpoint Name for the URL that will be configured.
-
You are allowed up to 64 characters of free text when creating an endpoint name.
-
-
The Endpoint URL must be unique and must begin with "https".
-
After providing your Endpoint URL, click the Test Connection button to ensure that the URL can be reached. Once a response has been successfully received, you can select the
Configure Channels option to select the notifications you wish to receive.-
If a failure message is returned, please double check that the URL you provided is correct, and that you have whitelisted the indicated IP address.
-
-
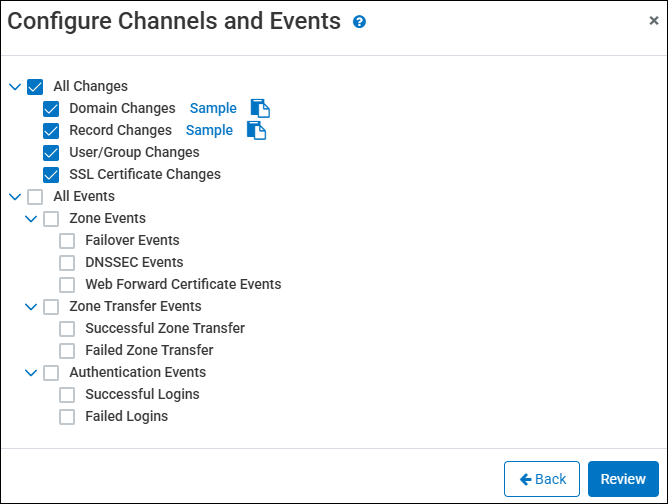
Select the Changes and Events that you want to be notified about from the available list.
-
Changes - Whenever a user-initiated change is made to the account or DNS configuration.
-
Events - Automatic system actions or user connections.
-
Click the Copy icon to quickly copy the Sample JSON details.
-
-
Click the Review button when you are finished making your selections.
-
Confirm the details on the Review page, and then click the Save button.
|
|
If this is the first Realtime Push Notification configured for the account, it will automatically be Enabled. Any future configurations will need to be manually Enabled. |
Editing the Realtime Push Notifications
Once a Push Notification has been configured for your account, you can click the Edit icon to make any necessary changes.
|
|
Once the Connection URL is configured, we will not continue to test the URL to ensure that it is still accessible. |
If you make changes to the Endpoint URL, you will need to click the Test Connection button again to ensure the UltraDNS system can connect to the new URL.
Click the Save button when you are finished. If you made any changes to the actual configuration settings, please wait sixty (60) seconds before notifications will begin to arrive.
Enabling & Disabling Realtime Push Notifications
After configuring a Realtime Push Notification URL, you will need to enable the connection to begin receiving notifications. Click on the toggle bar to change the setting to Enabled.
Once enabled, please wait up to sixty seconds before notifications will begin to be sent.
To disable a Realtime Push Notification configuration, simply click in the toggle bar so the Disabled status appears. The connection will be interrupted, and you will no longer receive notifications for the indicated Subscribed Events.
Test Connection
As previously stated, the UltraDNS Managed Services Portal will not continue testing your connection to ensure that it is still reachable once it has been configured. We recommend that
users occasionally click the Test Selected option to ensure that your connection is still stable, and that you are continuing to receive notifications.
Delete a Configuration
To delete one of your configured Realtime Push Notifications, simply select the bubble icon next to the configuration you want to delete and click the Delete Selected option.
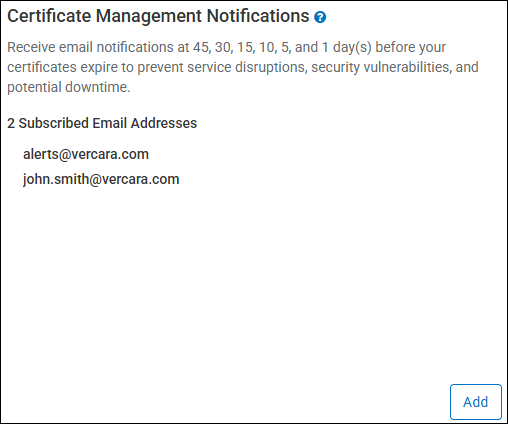
Certificate Management Notifications
The Certificate Management Notifications section allows you provide email addresses for recipient(s) that are notified when there are SSL/TLS Certificates for HTTPS redirects that are about to expire or have already expired. This feature is only visible to those accounts that have enabled the Certificate Management feature.
A maximum of 5 unique email addresses can be configured to receive the Certificate Management Notifications.
Email notification reminders are sent to the provided email addresses whenever a Certificate's expiration date is in the following range:
-
45 days
-
30 days
-
15 days
-
10 days
-
5 days
-
1 day
-
Expired
Click the Add button to begin configuring up to 5 email addresses.