Permissions
Administrative Permissions
|
|
The Primary Account Owner has full administrative access and permissions for the UltraDNS UI Portal, and they will not be displayed in the Users or Groups section (nor in the Stand Alone Users section) because their permission settings cannot be restricted or altered. |
The object types work as a hierarchy, allowing you to grant or remove access to entire sections of the UI through a single permission category.
The object Levels denote the following associated actions:
-
Account - Manages the permissions for the entire account; acts as the top tier when setting permissions.
-
Domain Services - Manages the access over the various Domain functions and features that include:
-
create/delete domains
-
DNSSEC signing
-
create a snapshot
-
creating pools and records
-
Domain - Manages the same features as the Domain Services permission, but provides more granular control over the various records and pools—especially if utilizing the Inherit option.
-
Resource Records - Manages the ability to create, edit, and delete pools and records. Permissions can be set for specific record and pool types.
-
Web Forwards - Manages the Domains > Web Forwards and Certificate Management sections of the account.
-
-
-
Reports - Manages the access to view and generate reports. Users assigned to Custom Groups (non-system generated) are not be able to see the Report permission.
-
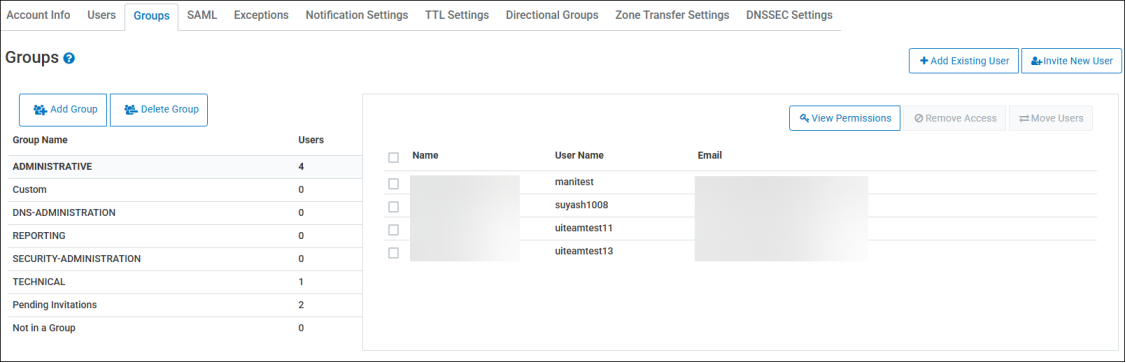
Viewing Groups and Stand-Alone Users
To view the list of configured groups and standalone users for your account:
-
Click Accounts from the left-hand navigation menu.
-
Select the Account Name.
-
Click the Groups tab.
-
The bottom of the list displays Not in a Group, which are standalone users or those users that have not yet been assigned to a group.
System Generated Groups
|
|
There are system-generated default groups with pre-configured permissions that cannot be altered. When users are added to these groups they inherit these pre-configured permissions. |
There is no limit to the number of users that can be assigned to a group.
-
ADMINISTRATIVE - Users have access to all account functions including being able to change the Primary user for the account. The Primary user and Administrative users are the only users that can invite new users to the account.
-
DNS-ADMINISTRATION - Users belonging to this group can perform all DNS configured operations, as well as managing Group configuration and management.
-
REPORTING - Users will have Read-only access for the entire account, meaning they cannot edit any account level or domain level details.
-
SECURITY-ADMINISTRATION - Users belonging to this group will be able to perform administrative and security operations at the account level, as well as additional user management functions.
-
TECHNICAL - Users will have access to all account functions except for the following:
-
Cannot add new users.
-
Cannot move users to and from groups.
-
Cannot change any of the Account Notification Settings.
-
Cannot access Account level Zone Transfer Settings.
-
Cannot initiate a DNS Health Check.
-
-
Pending Authorization - A group that is created only for SAML enabled accounts that have opted into the security feature, and are waiting for their account administrator to move them a designated security group.
-
Pending Invitation - Users that are created via the Invite New User function will appear in this group until the user accepts the invitation by following the steps outlined in the notification email they receive.
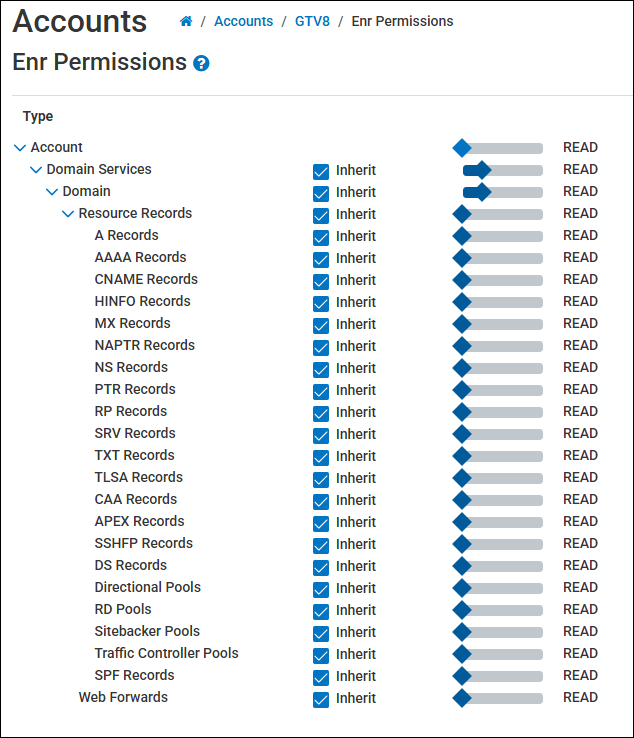
Viewing Permissions
Group Level Permissions
To view the permissions that are currently set for a group:
-
Select a group name from the list.
-
Select the View Permissions button.
-
The hierarchical tree diagram displays the various object levels that you can set permissions for.
-
Move the slider bar right or left to increase or decrease the level of permission for a specific object type.
-
You need to un-check the Inherit button from an object if you want to change the permission from the previous object type it was inherited from.
-
Inherit means that the selected object will acquire the permissions from the object that is above it in the hierarchy tree.
-
For example, if you set the permissions for Domain to Read Write Create, and then select the Inherit box for Resource Records, Resource Records will obtain Read Write Create permissions, and all of the record types that are under Resource Records will also obtain the Read Write Create permissions due to the trickle-down effect.
Stand Alone User Permissions
Stand Alone Users or the “Not in a Group” users, have their individual permissions set as they are not officially part of a group on the Portal. To set or view the permissions for a Stand Alone user:
-
Select the Not in a Groupgroup name.
-
Select the Permissions button for the specified user.
-
Use the slider bar to set the permission setting for each Object level for the user.
-
Select Save when you are finished.
Permission Level Explanations
The following table explains what each permission level signifies or allows a user to accomplish.
Permission Level Explanations
|
Permission |
Description |
|---|---|
|
None |
The user does not have access to view the selected Object type. |
|
Read |
The user is able to view any content pertaining to the selected Object type. |
|
Write |
The user is able to edit (make changes to) content pertaining to the selected Object type. |
|
Create |
The user is able to create new content pertaining to the selected Object type. For example, a user could create a new pool under the domain for an account and add new records to it. This also allows for the creation of a new domain. |
|
Delete |
The user is able to delete content pertaining to the selected Object type. |
|
Grant |
The grant permission type allows the user to manage the Accounts section, which includes being able to change the Primary User, create new user accounts, and also set or remove Permissions and Exceptions. |
It is important to note that the Reports object type only operates on the None or Read permission type, meaning a user either has the ability to view and customize reports, or they do not.
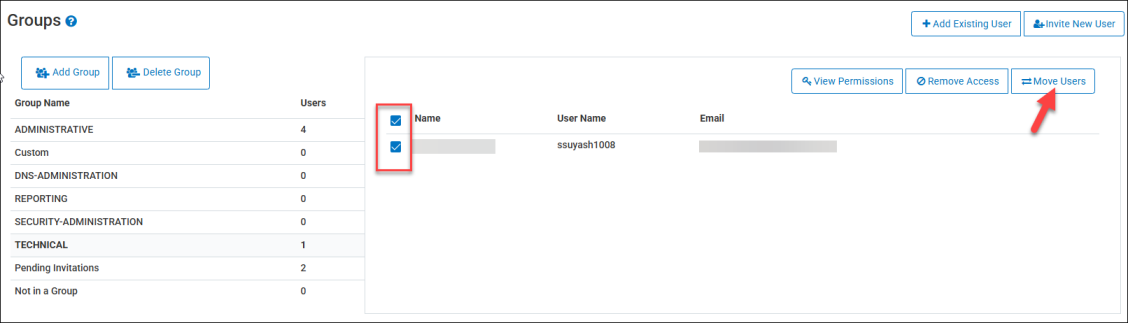
Adding Users to a Group
To add a user to a group:
-
Select a user from a group, or from Not in a Group.
-
Click the Move Users button.
-
In the Destination drop-down menu, select the new group for the user.
-
Click the Move button. The user is removed from their from the previous group, and moved to the new group.
Exceptions
The Exceptions tab displays the permission exceptions that are created for users and groups within the account. When the permission level is set for an Object Type (i.e. Account, Domain, Resource Record etc.), every sub-object adheres to that permission level, unless you create an exception.
For example, you create Group A, and you set the permission level for Domain to READ WRITE, thereby allowing every user in Group A to view and edit all domains. However, there is one specific zone that you don’t want the users in Group A to be able to edit, so you create an exception for that one zone, and set the permission level to READ only.
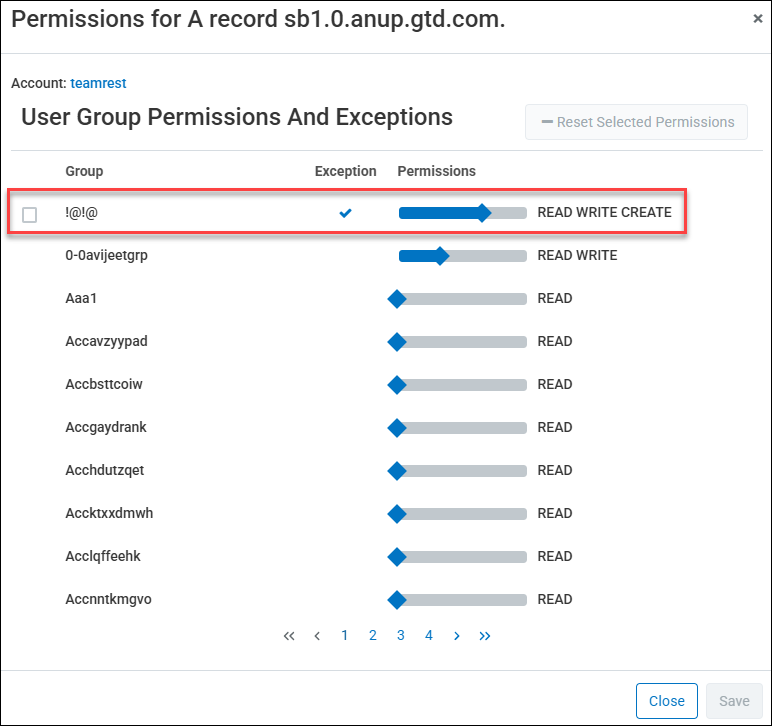
Creating an Exception
To create an exception for a domain:
-
Find your desired domain name from the Domains list, and then select the
 icon under the Perms heading.
 -
The Permissions window displays all of the configured groups and standalone users, along with the permission level that each has for the specified domain. Use the slider bar to set the desired permission level for each group or user for the selected domain.
-
Standalone users (users not assigned to a group) will appear on the very last page of the Groups list.
-
-
Select the Save button once you have set all of the new permissions.
Each user or group that had a permission changed displays a checkbox next to their name, as well as an arrow under the Exceptions header, indicating that an exception is currently in place for the specified domain.
Resetting Permissions and Exceptions
Once an exception has been created for a group, you can either reset the permission from the specific domain, or delete it from the Accounts section.
To reset an exception to a Domain:
-
Select the
icon next to the domain that has the exceptions set. -
Select the checkbox for each group or user you want to reset the permissions for.
-
Select the Reset Selected Permissions button.
The permissions automatically revert back to the default permissions, or the last configured permissions, if there are any.
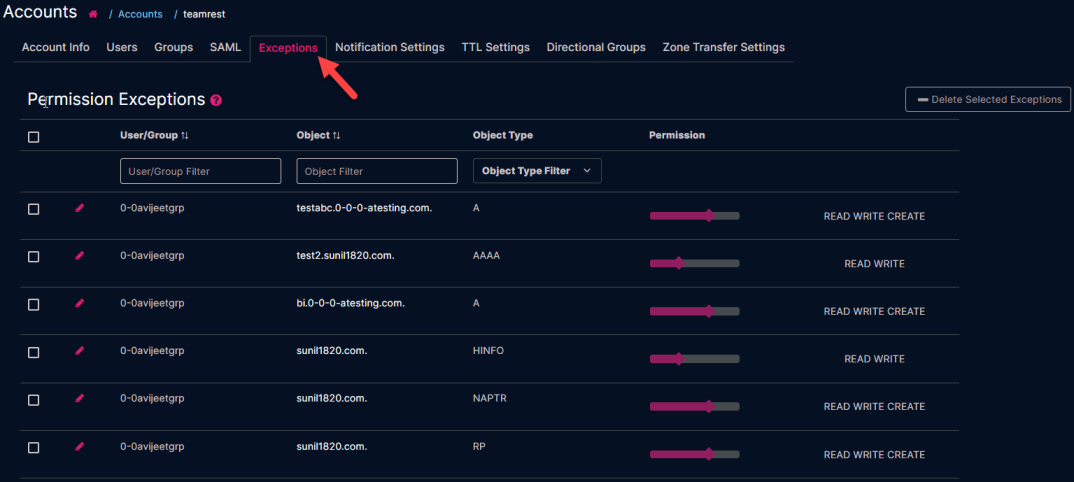
Viewing Exceptions
To see a list of the current exceptions for an account:
-
Select Accounts from the left-hand navigation menu.
-
Select the desired Account Name.
-
Select the Exceptions tab.
Each exception provides the following details:
-
User/Group – The current user or group that has the exception.
-
Object – The specific object name being impacted. (i.e. a zone name)
-
Object Type – The category to which the object belongs.
-
Permission – The current permission level (with the exception included) that is impacting the object.
Edit an Exception
To edit an exception:
-
Click the
 icon next to the exception you want to edit.
 -
Use the slider bar to change the permission level for the object.
-
Select the checkmark icon to save changes. Clicking the X icon will cancel the change you’ve made.

Delete an Exception
-
Select the checkbox next to the exception you want to delete.
-
Select the Delete Selected Exceptions button.
-
Select Delete to confirm the deletion.
Deleting an exception does not change the base permission for the user or group. Only exception that was placed on the specific object is removed.